100kg Ceiling Anchor Kit: Technical Installation Guide
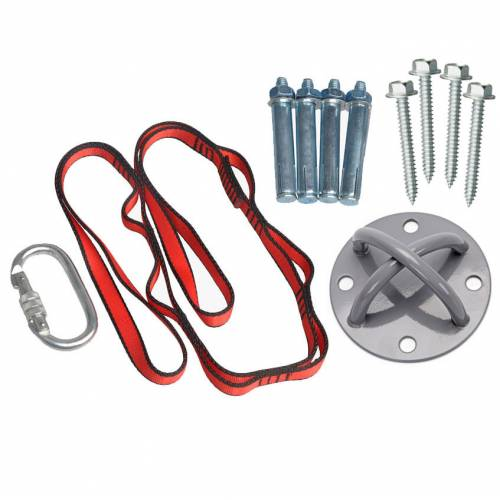
The 100kg Anchor Kit functions as a high-stability interface for suspended loads. If you are planning your new indoor relaxation zone, be sure to read our comprehensive guide on how to safely hang a hammock or swing indoors. Its defining feature is the 120mm diameter plate, which is significantly wider than standard mounts. This technical design increases the surface area contact with the ceiling, reducing the "pull-through" pressure on the plasterboard or timber grain.
Product Specifications
- Safe Working Load (SWL): 100kg per anchor plate.
- Plate Dimensions: 120mm (12cm) diameter for optimal load distribution.
- Substrate Compatibility: Concrete/Masonry & Structural Timber.
- Interface: Closed loop ring for carabiner or strap choke-hitch attachment.
Professional Installation Protocols
1. Preparation & Layout
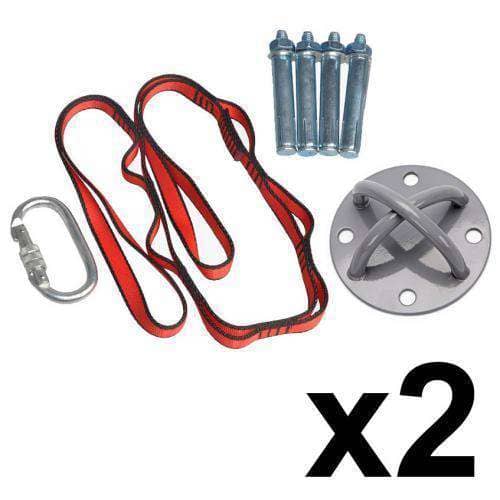
For Sensory Swings: Ideally, install two anchor points spaced 400mm – 500mm (40–50cm) apart. This spacing reduces pendulum collision risk while maintaining a comforting, linear swing motion.
For Hammock Chairs: A single central point is required. Ensure a clearance radius of at least 1.0 metre from walls or furniture.
2. Installation by Substrate
Method A: Structural Timber (Joists/Beams)
⚠️ CRITICAL: Never use the expansion bolts (sleeve anchors) in wood. They will split the timber grain, leading to failure. Use heavy-duty wood screws instead.
- Locate Centre: Use a stud finder to locate the exact centre of the ceiling joist (typically 90mm x 35mm or larger).
- Pilot Drilling: Mark the holes using the 120mm plate as a template. Drill pilot holes using a bit 2mm smaller than the screw shank.
- Fastening: Secure the plate using heavy-duty wood screws. Ensure the screw bites at least 50mm into the solid timber.
Method B: Concrete & Masonry (Slab/Brick)
- Drilling: Use a hammer drill with a masonry bit matching the diameter of the provided sleeve anchors.
- Clearance: Vacuum or blow out all concrete dust from the hole. Dust prevents the friction-lock from engaging.
- Expansion: Insert the sleeve anchor through the plate and into the hole. Tighten the nut to expand the sleeve against the concrete.
Functional Comparison Table
| Feature | Sensory Swing | Hammock Chair |
|---|---|---|
| Anchor Points | 2 Points | 1 Point |
| Spacing | 400mm – 500mm apart | N/A (Central) |
| Movement Type | Linear Swing (Front/Back) | Rotational & Axial Tension |
| Load Limit | 200kg Total (100kg x 2 plates) | 100kg Total (1 plate used) |
| Best Fastener | Coach Screw (Wood) or Bolt (Concrete) | Coach Screw (Wood) or Bolt (Concrete) |
Safety Verification: After installation, perform a "Dead Weight Test." Have an adult hang their full weight on the strap (feet off the ground) for 10 seconds before allowing a child to use the equipment.
Common Questions For Ceiling Mount Kits
How long does shipping take?
Orders are typically processed within 1–2 business days.
While we prioritize fast dispatch across Australia, shipping to regions outside the East Coast metropolitan zones takes a little extra time. For deliveries to Western Australia, South Australia, the Northern Territory, and Tasmania, you can generally expect your order to arrive within 3 to 5 business days.
If you are located in a more remote or regional area within these states, please allow up to 7 to 10 business days for your items to reach you.
What is your return policy?
We accept returns within 30 days of delivery on unused items in original condition. To start a return, contact our support team and we’ll guide you through the process.
Can I change or cancel my order?
If your order hasn’t shipped yet, we’ll do our best to accommodate changes or cancellations. Reach out to our support team as soon as possible for assistance.
My kit came with expansion bolts. Can I use them on my wooden pergola?
How far apart should I space the anchor points for a sensory swing?
How often should I check the setup?
Can I use the provided expansion bolts to install the anchor into a wooden beam or pergola?
Why is the anchor plate 12cm (120mm) wide?
Let customers speak for us

Comfortable cushion, great service!
I ordered a new cushion for my very old and tired egg chair. I was delighted the cushion turned up in only 3 or 4 days, and it looks great. Perfect timing for spring - I can now retire to my comfortable chair with my book in the sunshine. Very pleased!

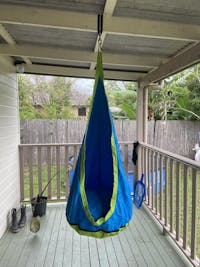
Hideout hanging tent
My son absolutely loves his hanging tent, he is in there all the time, and it has been a great space for sensory regulation.

Sensory swing with stand
Extremely happy with the sensory swing and stand that we ordered through siesta hammocks, it’s great quality and very durable. My son loves it!

Great hammock and fantastic delivery
I have struggled to find hammocks long enough to fit between my two veranda columns. These are perfect, longer than most, well made and bloody comfortable 😂
Delivery was within two days and I ordered on a Sunday AAA+++ rating on all aspects.
PS the dog loves it too 🍻

Excellent
Very happy with this product. Thank you
Great little pod
easily hung and amazing materials very durable . Kids love spinning and swinging in it.

Amazing!!
I bought this hammock chair with the frame and absolutely love it! It is great on my balcony, and I spend many hours reading my book in it. Absolutely love it!! Super comfy, roomy and my new chill out zone at home ❤️

Love this place good customer service
Love this place good customer service always answers my emails back straight away and always been so helpful I've bort like 5 things thru them my son loves it thanks guys will be getting more stuff soon!

Pod chair cushion
Product was delivered as described and in a timely manner. Very happy,

Great
Delivered on time..great prices and good quality hammocks.

Egg chair cushions
Bought two cushions in black they look amazing and are very comfortable highly recommended

Therapy Sensory Swing with Hammock Chair Stand
Wonderful
Great colour. Comfortable.

excellent service
the first time I have dealt with this company and more than pleased with the absolute professional service. I will be a return customer

Ooh, such a comfortable hammock.
I have moved on to permanent hammock sleeping, and for the how weather this fabulous. I do occasionally get my toes caught in the holes, but hey, small price to pay for such deliciousness.